In addition to DV FireWire camera support, iMovie 4 added compatibility with some IIDC-based FireWire video cameras including the external version of the Apple iSight camera.
To use the built-in iSight included with some Macintosh models, use iMovie HD 6 or later.
If your iSight camera is not recognized by iMovie ("no camera is attached" message), make sure you are using the correct version of iMovie. Check also to make sure that other applications which may be using the camera are not open, such as Photo Booth or iChat. iMovie cannot access the iSight camera if it is already in use by another application.
Tip: For best results when capturing from an iSight camera, make sure your subject is well lit.
Built-in iSight camera not recognized:
In iMovie 7.1.2 or later, you may not be able to use your built-in iSight camera to capture footage in iMovie. iMovie may not recognize the camera. This may occur even if you are able to activate the camera in other applications, such as iChat.
Resolution:
If you are experiencing this behavior, follow the steps below:
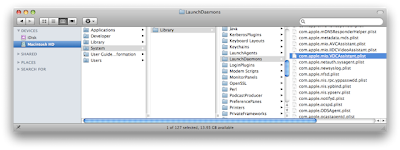
1. In Finder, navigate to /System/Library/LaunchDaemons

2. Select the file com.apple.mio.VDCAssistant.plist and delete.
3. Restart your system.
You should now be able to use your iSight camera with iMovie.
Adding and removing audio tracks:
In iMovie, you can easily add and remove audio tracks to your project.
1. Open your project in iMovie '08 and click the Music and Sound Effects button.
The Music and Sound Effects window opens in the lower right corner of your iMovie project window.
2. Select a song from the Music and Sound Effects window, then drag and drop it over the gray space of your project background. The gray background turns green as you drag your song over the background.
You can also specify the exact location (pinning) that you want your audio file to start by dragging it over a video clip (not the background). As you drag your song, a vertical red line indicates where the audio track will begin when you release the mouse button.
Your audio track appears as a green bar under your project’s video clips.
Note: After adding the audio, you can move it within your project by dragging the green audio bar.
The example above describes adding a pinned audio track, but in iMovie '08 you can add multiple sound tracks like sound effects, background music and voice over recordings.
3. To remove an audio track from your iMovie project, simply select the audio track (the green audio track is then outlined with a yellow line) and press the Delete key and the audio tracked is erased from your project.
4. If you want to remove a song you added to the background, select the green background area to highlight it the song and press the Delete key.
Changing transition times:
You can change the duration of the transitions in your video project, setting how long it takes for one clip to transition fully to the next. Transitions can be no longer than half the length of the shortest adjacent clip.
Follow these steps to change the transition duration:
1. In your iMovie project, select the transition whose duration you want to adjust. When selected, the transition is highlighted by a yellow rectangle. The transition time displays when you move your pointer over it. In this example the transition duration is 0.5 seconds.
2. rom the Edit menu, choose Set Duration.
3. When the Set Duration window opens, the current transition time is displayed in the Duration field. Type in the new duration and select the option to apply the duration to the selected transition or apply to all transitions in your project.
Click OK.
4. Move your pointer over the transition to see the new duration. In this example, it was increased from .5s to 1.0s.
Note: If you added transitions to your project using the automatic transition feature, you can't change them individually.